Homemade Mold Bread
Learn how to make delicious and healthy homemade mold bread with this comprehensive guide. Discover step-by-step instructions, tips, and FAQs to perfect your bread-making skills.

Introduction: The Joy of Homemade Mold Bread
There’s something incredibly satisfying about the aroma of freshly baked bread filling your home. If you’re a baking enthusiast or simply enjoy homemade treats, learning how to make your own mold bread can be a rewarding endeavor. In this article, we’ll walk you through the process of baking delicious and healthy homemade mold bread, from selecting the right ingredients to mastering the techniques.
Homemade Mold Bread: Crafting Your Culinary Masterpiece
Baking your own mold bread not only allows you to control the ingredients but also promises a delightful sensory experience. The key lies in the process, ingredients, and a pinch of patience.

Selecting the Right Ingredients
The foundation of any great bread is its ingredients. Opt for high-quality flour, preferably a mix of whole wheat and all-purpose flour, to strike the right balance between nutrition and texture. Fresh yeast or active dry yeast will give your bread the perfect rise, while water, salt, and a touch of honey or sugar round up the essential components.
Kneading: A Labor of Love
Kneading is where the magic happens. The act of folding, pressing, and stretching the dough develops gluten, giving your bread structure and elasticity. Knead your dough until it’s smooth, soft, and slightly tacky to the touch.
The First Rise: Letting It Rest
Allow your dough to rest and rise in a warm, draft-free place. This is when the yeast works its wonders, causing the dough to double in size. Patience is key here – a longer rise results in a more flavorful and aromatic bread.
Shaping Your Bread
Once the dough has risen, gently deflate it and shape it according to your preference. Whether you’re aiming for a classic loaf or experimenting with artisanal shapes, make sure to tuck in the edges for a neat appearance.

The Second Rise: Unveiling the Potential
After shaping, the dough undergoes a second rise. This step is crucial as it ensures the bread’s final structure and texture. Be sure not to rush this process, as it contributes to the distinct homemade flavor.
Baking: Transforming Dough into Bread
Preheat your oven and place a pan of water on the bottom rack to create steam, which results in a crisp crust. Slashing the dough’s surface before baking allows it to expand gracefully. Bake until your homemade mold bread turns a beautiful golden brown.
Cooling and Enjoyment
Resist the urge to cut into your freshly baked bread immediately. Allowing it to cool on a wire rack ensures that the interior finishes setting. Once cooled, slice, and enjoy – whether with butter, jam, or as the foundation for a scrumptious sandwich.

Embrace Freshness and Flavor with Your Own Mold Bread Creation
Bread enthusiasts know that there’s something truly special about baking your own bread. The aroma that fills the air, the warmth of the oven, and the anticipation of that first delicious bite – these are just a few reasons why homemade bread holds a special place in many hearts. If you’re seeking to elevate your bread-making journey, why not delve into the realm of homemade mold bread? It’s an art that promises unparalleled freshness and a symphony of flavors.
Unveiling the Beauty of Homemade Mold Bread
When you embark on the journey of crafting your own mold bread, you’re not merely baking a loaf; you’re nurturing an experience. Every step, from selecting the finest ingredients to the patient waiting as the dough rises, contributes to the symphony of flavors that will soon dance on your taste buds.
The Ingredients That Matter
In your quest to create the perfect mold bread, the quality of your ingredients is paramount. Opt for premium-grade flour – whether you prefer whole wheat or all-purpose, choosing the best will reward you with a more delectable outcome. Yeast, a magical catalyst, is equally crucial. Let it bloom and awaken its full potential before introducing it to your dough mixture. Don’t forget to sprinkle in a pinch of love – it’s the secret ingredient that makes homemade bread truly special.
Mixing and Kneading to Perfection
As you blend your ingredients, your hands become conductors of a delicious symphony. Feel the texture of the dough evolve as the flour and water unite into a harmonious whole. Kneading is your rhythmic meditation, a tactile connection with the bread’s future. The dough’s elasticity will tell you when it’s ready – supple, yet firm, ready to rise and transform.
The Dance of Fermentation
Patience is a virtue, especially in the realm of mold bread. Allow your dough to rest and rise, giving the yeast time to work its magic. Covered with a clean cloth, your dough becomes a cocoon of transformation. This waiting game is the foundation of flavor development – a slow crescendo that promises a rich taste profile.

Crafting the Perfect Mold
Mold, often feared, becomes an ally in your mold bread escapade. Embrace it, but on your terms. Select the molds you wish to introduce – whether it’s the enchanting aroma of rosemary or the robust earthiness of sun-dried tomatoes. Gently incorporate them into your dough, mindful of the balance you seek to achieve.
Baking – Where Magic Happens
As you slide your creation into the preheated embrace of the oven, the magic intensifies. The dough transforms, rising to its final form, and the aromas that fill the air become irresistible. The crust turns into a masterpiece of texture – crisp, yet tender, a prelude to the symphony of flavors within.
Enjoying the Fruits of Your Labor
Finally, the moment arrives. As you pull your homemade mold bread from the oven, a sense of accomplishment washes over you. Allow it to cool briefly – the anticipation adding to the experience. Slice into the loaf and marvel at the intricate structure, a testament to your artistry. The first bite is a revelation – a burst of flavors, a perfect harmony of freshness, and a touch of nostalgia.

Supporting the Journey
The path of mastering homemade mold bread is a fulfilling one. As you embark on this culinary adventure, consider supporting fellow artisans who share their expertise and passion. Your journey becomes a part of a larger tapestry, one woven with the threads of dedication, creativity, and the simple joy of sharing.
FAQs: Your Bread-Baking Queries Answered
The first rise typically takes around 1 to 2 hours, depending on the temperature of your kitchen and the yeast’s activity.
While whole wheat flour adds a nutty flavor and extra nutrition, using a mix of whole wheat and all-purpose flour yields a more balanced texture.
The second rise allows the dough to relax and develop its final structure. It contributes to the bread’s flavor and ensures an airy crumb.
Absolutely! Once the bread has cooled completely, slice it, and store it in an airtight bag. Thaw slices as needed, to enjoy the freshness of homemade bread anytime.
For a softer crust, brush the bread with melted butter immediately after taking it out of the oven. Covering it with a clean kitchen towel while it cools also helps.
Certainly! Adding nuts, seeds, or dried fruits can enhance the flavor and texture of your bread. Incorporate them during the kneading process.
Conclusion: A Slice of Fulfillment
Baking your own homemade mold bread is a gratifying journey that rewards you with the delightful aroma, taste, and texture of fresh bread. By following these steps and understanding the art of bread-making, you’ll not only master a valuable culinary skill but also enjoy the satisfaction of creating something truly special. So roll up your sleeves, gather your ingredients, and embark on the wonderful adventure of baking your very own mold bread.
In conclusion, crafting homemade mold bread is an art that combines patience, precision, and passion. From the initial blending of ingredients to the final, flavorful bite, each step is a testament to your dedication. So, roll up your sleeves, gather your ingredients, and embark on this delectable journey – one that promises not just a loaf of bread, but a masterpiece of taste and memories.
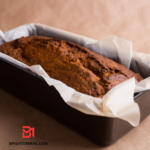
Homemade Mold Bread
Ingredients
- 3 cups all-purpose flour
- 1 cup whole wheat flour
- 2 tsp active dry yeast
- 1 ½ tsp salt
- 1 ½ cups warm water
- 2 tbsp honey or sugar
- 2 tbsp olive oil
Instructions
Activate the Yeast:
- In a bowl, combine warm water and honey (or sugar). Sprinkle the yeast over the mixture and let it sit for about 5-10 minutes, until it becomes frothy.
Mix the Dry Ingredients:
- In a large mixing bowl, combine the all-purpose flour, whole wheat flour, and salt.
Combine Wet and Dry Ingredients:
- Make a well in the center of the dry ingredients and pour in the yeast mixture. Add olive oil. Mix until the dough comes together.
Knead the Dough:
- Flour a clean surface and turn out the dough. Knead for about 8-10 minutes until the dough is smooth and elastic.
First Rise:
- Place the dough in a lightly oiled bowl, cover it with a damp cloth, and let it rise in a warm place for 1-2 hours, or until it doubles in size.
Punch Down and Shape:
- Gently punch down the dough to release air. Shape it into a loaf or the desired shape.
Second Rise:
- Place the shaped dough on a baking sheet or in a greased loaf pan. Cover it with a cloth and let it rise for another 30-45 minutes.
Preheat the Oven:
- Preheat your oven to 375°F (190°C).
Bake:
- If desired, slash the top of the bread with a sharp knife. Bake in the preheated oven for 25-30 minutes, or until the bread sounds hollow when tapped on the bottom.
Cool and Enjoy:
- Remove the bread from the oven and let it cool on a wire rack before slicing.
Notes
Nutrition
Other Bread Recipes:
SO, IF YOU LIKE THIS RECIPE SHARE IT, AND FOLLOW ME ON PINTEREST AND FACEBOOK