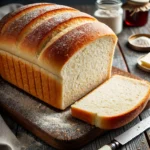
Sandwich bread recipe
Who doesn't love the smell of freshly baked bread? Making your own sandwich bread recipe at home is a rewarding experience.
Print Recipe
Pin Recipe
Equipment
- 1 stand mixer with hook attachment (or a bowl and your hands)
- 1 loaf pan
- 1 Rubber Spatula or wooden spoon
- 1 digital kitchen scale
- 1 pastry brush
Ingredients
- 1 cup 240 ml water, warmed to approximately 110°F (43°C)
- 1/4 cup 60 ml whole milk, warmed to approximately 110°F (43°C)
- 2 1/4 teaspoons 7 g Platinum Yeast from Red Star instant yeast (1 standard packet)
- 2 tablespoons 25 g granulated sugar
- 4 tablespoons 1/4 cup; 56 g unsalted butter, softened to room temperature
- 1 1/2 teaspoons salt
- 3 1/3 cups about 420–430 g all-purpose or bread flour (spooned and leveled), plus additional as needed
Instructions
- Prepare the Dough: In the bowl of your stand mixer fitted with a dough hook or paddle attachment, whisk together the warm water, warm milk, yeast, and sugar. Cover and let sit for 5 minutes. Add the butter, salt, and 1 cup of flour. Mix on low speed for 30 seconds, then scrape down the sides of the bowl. Add another cup of flour and mix on medium speed until mostly combined (some butter chunks may remain). Add the remaining flour and continue mixing on medium speed until the dough comes together and pulls away from the sides of the bowl, about 2 minutes. If you don’t have a mixer, use a large wooden spoon or silicone spatula, though it will require some effort!
- Knead the Dough: Keep the dough in the mixer and knead for an additional 5–8 minutes, or knead by hand on a lightly floured surface for the same amount of time. If the dough becomes too sticky, add 1 teaspoon of flour at a time to make it soft and slightly tacky. Avoid adding too much flour to prevent a dry dough. The dough should feel a bit soft and bounce back slowly when poked. You can also perform a "windowpane test" by stretching a small piece of dough until it’s thin enough for light to pass through. If it stretches without tearing, it’s ready. If not, keep kneading.
- 1st Rise: Lightly grease a large bowl with olive oil or nonstick spray. Place the dough in the bowl, turning to coat all sides with oil. Cover and let rise in a warm environment for 1-2 hours, or until doubled in size. For a faster rise, you can refer to my Baking with Yeast Guide.
- Shape the Bread: Grease a 9×5-inch loaf pan. Punch down the risen dough to release air. Lightly flour a work surface, your hands, and a rolling pin. Roll out the dough into a large rectangle, about 8×15 inches. Roll it up into an 8-inch log and place it in the prepared loaf pan.
- 2nd Rise: Cover the shaped loaf with aluminum foil, plastic wrap, or a clean kitchen towel. Allow it to rise until it’s about 1 inch above the top of the loaf pan, about 1 hour.
- Bake the Bread: Adjust the oven rack to a lower position and preheat the oven to 350°F (177°C). Bake the bread for 30-34 minutes, or until golden brown on top. If the top browns too quickly, loosely tent the pan with aluminum foil (usually around the 20-minute mark). The bread is done when it sounds hollow when tapped or an instant-read thermometer reads 195–200°F (90–93°C) in the center.
- Cool and Store: Remove the bread from the oven and let it cool in the pan for a few minutes before transferring it to a cooling rack. You can slice it after it cools, or let it cool completely before slicing. Store leftover bread tightly at room temperature for up to 6 days or in the refrigerator for up to 10 days.
Notes
Freezing Instructions: Prepare the recipe up to step 6. Place the shaped loaf in a greased 9×5-inch loaf pan or a disposable loaf pan, cover tightly, and freeze for up to 3 months. On the day you plan to serve it, let the loaf thaw and rise at room temperature for about 4-5 hours. Bake as directed. Alternatively, you can freeze the baked loaf. Allow the bread to cool completely, then freeze for up to 3 months. Thaw in the refrigerator or at room temperature before reheating as desired.
Overnight Instructions: Prepare the recipe up to step 6. Cover the shaped bread tightly and refrigerate for up to 15 hours. At least 3 hours before you plan to bake, remove from the refrigerator, keep covered, and let it rise on the counter for 1-2 hours. Alternatively, you can let the dough rise in the refrigerator overnight. Cover the dough tightly and refrigerate for up to 12 hours. Remove from the refrigerator and let it rise at room temperature for 2 more hours before proceeding to step 5.
Special Tools (affiliate links): Electric Stand Mixer or Large Glass Mixing Bowl with Wooden Spoon / Silicone Spatula | 9×5-inch Loaf Pan | Rolling Pin
Yeast: Platinum Yeast from Red Star is an instant yeast, but any instant yeast will work. You can also use active dry yeast, though rise times will be slightly longer. For more information on yeast, refer to my Baking with Yeast Guide.
Flour: You can use all-purpose or bread flour. While all-purpose flour is convenient, bread flour yields a chewier loaf, which I highly recommend. The bread will be soft with either flour. I don’t recommend using whole wheat flour due to its different baking properties. If you prefer whole wheat, try my recipe for whole wheat bread.
Doubling the Recipe: For best results, make two separate batches of dough. If you prefer to double the recipe in one bowl, use double the amount of all ingredients except for the yeast and butter. Use 3 1/4 teaspoons of yeast and 6 tablespoons of butter.
Bread Machine Questions: I haven’t tested this recipe in a bread machine, but some readers have reported success using one.
Adapted from Homemade Cinnamon Swirl Bread
Nutrition
Serving: 12slices | Calories: 176kcal
Tried this recipe?Mention @Brightermeal or tag #Brightermeal!