
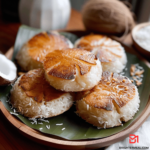
Authentic Bibingka Recipe
Authentic Bibingka Recipe is a delectable Filipino rice cake that holds a special place in the hearts of many. This traditional delicacy is often enjoyed during festive occasions, religious celebrations, or simply as a delightful snack. With its unique blend of flavors and textures, bibingka offers a truly memorable culinary experience.

History and Origin
The origins of Authentic Bibingka Recipe can be traced back to pre-colonial Philippines, where it was already a beloved treat among indigenous communities. Over the centuries, the recipe evolved, incorporating influences from Spanish, Chinese, and Malay cuisines. Today, bibingka remains an integral part of Filipino culinary heritage, cherished for its rich cultural significance.
Ingredients
Traditional Ingredients
- Glutinous rice flour
- Coconut milk
- Sugar
- Eggs
- Butter
- Freshly grated coconut
Variations and Substitutes
Depending on regional preferences and personal taste, variations of Authentic Bibingka Recipe may include ingredients such as cassava, cheese, or even chocolate. For those with dietary restrictions, substitutes like coconut sugar or gluten-free flour can be used to accommodate different needs.
Preparation Method
Creating the perfect bibingka requires precision and care. Follow these step-by-step instructions to achieve delicious results:
- Preheat the oven to the specified temperature.
- Prepare the batter by combining glutinous rice flour, coconut milk, sugar, eggs, and melted butter in a mixing bowl.
- Grease the banana leaves or baking pan with butter to prevent sticking.
- Pour the batter into the prepared pan and spread it evenly.
- Top with grated coconut for added flavor and texture.
- Bake in the preheated oven until the bibingka is golden brown and cooked through.
- Serve warm and enjoy with your favorite toppings or accompaniments.
Tools and Equipment
To make bibingka, you’ll need basic kitchen tools such as mixing bowls, measuring cups and spoons, a baking pan, and an oven. Traditional methods may also involve using banana leaves to line the pan for added aroma and flavor.
Tips for Making Perfect Authentic Bibingka Recipe
- Use fresh, high-quality ingredients for the best results.
- Adjust the sweetness to your preference by varying the amount of sugar.
- Experiment with different toppings and fillings to create unique flavor combinations.
- Monitor the baking time closely to avoid overcooking or burning.
Serving Suggestions
Bibingka is best enjoyed fresh out of the oven, served warm with a cup of hot coffee or tea. It pairs perfectly with savory dishes like grilled meats or seafood, or can be enjoyed on its own as a delightful snack or dessert.
Nutritional Information
While bibingka is undeniably delicious, it’s important to enjoy it in moderation as part of a balanced diet. With its main ingredients of rice flour, coconut milk, and eggs, bibingka provides a source of carbohydrates, protein, and healthy fats.
Health Benefits
Coconut milk and grated coconut used in Authentic Bibingka Recipe are rich in vitamins, minerals, and antioxidants, offering various health benefits such as improved heart health, digestion, and immune function. However, it’s essential to be mindful of portion sizes and overall dietary intake.
Popular Variations
Throughout the Philippines, you’ll find a wide range of regional variations of Authentic Bibingka Recipe, each with its own unique twist. Some popular variations include bibingka galapong, bibingka malagkit, and bibingka cassava, each offering a distinct flavor and texture profile.
Cultural Significance
Beyond its culinary appeal, Authentic Bibingka Recipe holds deep cultural significance in Filipino society. It’s often associated with religious festivities such as Christmas and Easter, where it’s served as part of traditional holiday feasts and gatherings. In rural areas, it’s also a symbol of community spirit, with neighbors coming together to prepare and share bibingka during special occasions.
Bibingka Around the World
Thanks to the Filipino diaspora, Authentic Bibingka Recipe has gained popularity beyond the shores of the Philippines, finding its way onto international menus and gaining recognition as a beloved delicacy worldwide. From bustling cities to remote corners of the globe, bibingka continues to captivate hearts and taste buds wherever it goes.
Conclusion
In conclusion, Authentic Bibingka Recipe is more than just a delicious rice cake – it’s a symbol of Filipino heritage, culture, and tradition. Whether enjoyed as a festive treat or a simple pleasure, bibingka brings people together, celebrating the rich tapestry of flavors and experiences that make Filipino cuisine truly special.
Unique FAQs
- Can I make bibingka without coconut milk?
- While coconut milk adds richness and flavor to bibingka, you can substitute it with regular milk or almond milk if needed.
- What’s the difference between bibingka and puto?
- Bibingka is made with glutinous rice flour and coconut milk, resulting in a denser texture, while puto is made with regular rice flour and has a lighter, fluffier consistency.
- Can I freeze leftover bibingka?
- Yes, you can freeze bibingka for later consumption. Simply wrap it tightly in plastic wrap or aluminum foil and store it in an airtight container in the freezer. Thaw and reheat before serving.
- What are some creative toppings for bibingka?
- Popular toppings for bibingka include salted egg slices, grated cheese, and even cooked meat or seafood for a savory twist.
- Is bibingka gluten-free?
- Traditional bibingka made with glutinous rice flour is not gluten-free. However, you can make gluten-free bibingka by using a combination of rice flour and tapioca flour instead.
Authentic Bibingka Recipe
Ingredients
- 3 Cups rice flour
- 1 1/2 Tablespoon baking powder
- 1 Cup brown sugar
- 3 Eggs
- 3 Cups coconut milk
- 1 1/2 Teaspoon vanilla extract
- 1/2 Teaspoon salt
Instructions
- In a large mixing bowl combine flour, baking powder, salt and brown sugar. Whisk together and set aside.
- Put eggs in a separate bowl, add vanilla extract and coconut milk, beat with a whisk.
- Pour the flour mixture over the coconut milk mixture. Fold with a whisk until smooth and free of lumps.
- Pour batter into the banana leaf lined baking mould or pan.
- Bake in a pre-heated oven at 400°F for 30 minutes.
- Cooking Tips
- Insert toothpick in the center and make sure it comes out dry.
- For better result, try using fresh coconut milk instead of the canned coconut milk.
- For a light crusty top, Turn on the broiler during the last few minutes of baking.
- Do not overbeat the batter.


