
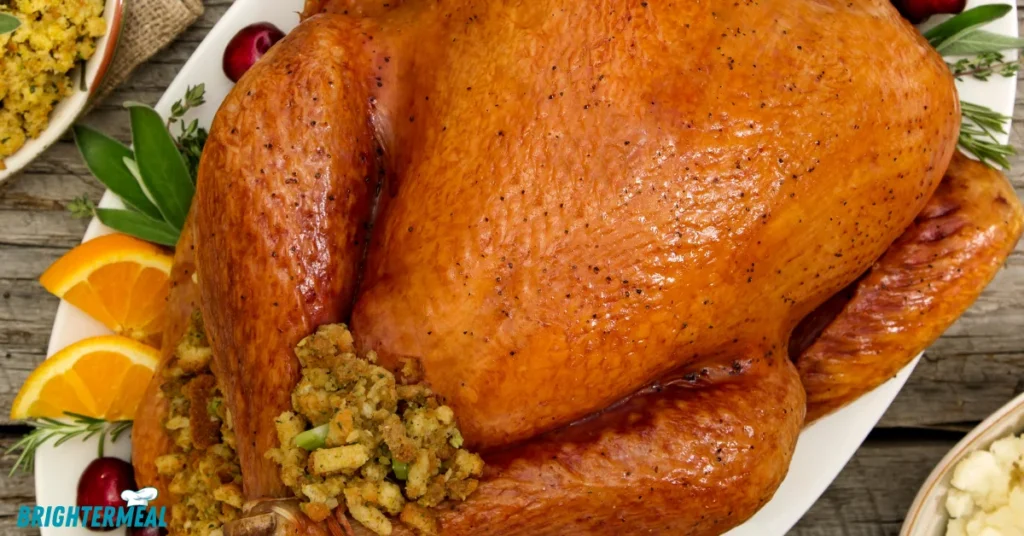
Chicken brine recipe

Chicken Brine recipe is a simple yet effective way to ensure tender, juicy, and flavorful meat. Whether you’re preparing a roast, grilling, or frying, brining enhances the taste and texture of your chicken. Below is a step-by-step guide to creating the perfect Chicken brine recipe.

Chicken brine recipe
Chicken Brine recipe is one of those culinary secrets that can take your poultry from good to phenomenal. But what exactly is brining, and why should you consider it for your next chicken dish? In this article, we’ll explore the ins and outs of brining, offering a step-by-step guide to creating a delicious and effective chicken brine recipe.
What is Brining?
Brining is a process where meat is soaked in a saltwater solution before cooking. This technique helps to tenderize the meat, enhance its flavor, and keep it moist during cooking. The process works by allowing the salt in the brine to penetrate the meat, breaking down muscle fibers, and ensuring the chicken retains more moisture.
Importance of Brining Chicken
Chicken, particularly lean cuts like breasts, can easily become dry when cooked. Brining is a simple method to prevent this, ensuring your chicken stays juicy and flavorful. Whether you’re roasting, grilling, or frying, brining can elevate your chicken to new levels of deliciousness.

Why Brining Chicken is Essential
Brining is a process of soaking meat in a solution of water, salt, and other seasonings. The saltwater solution helps the meat absorb moisture, resulting in a juicy and tender dish. It also allows the chicken to absorb the flavors of any added herbs or spices.
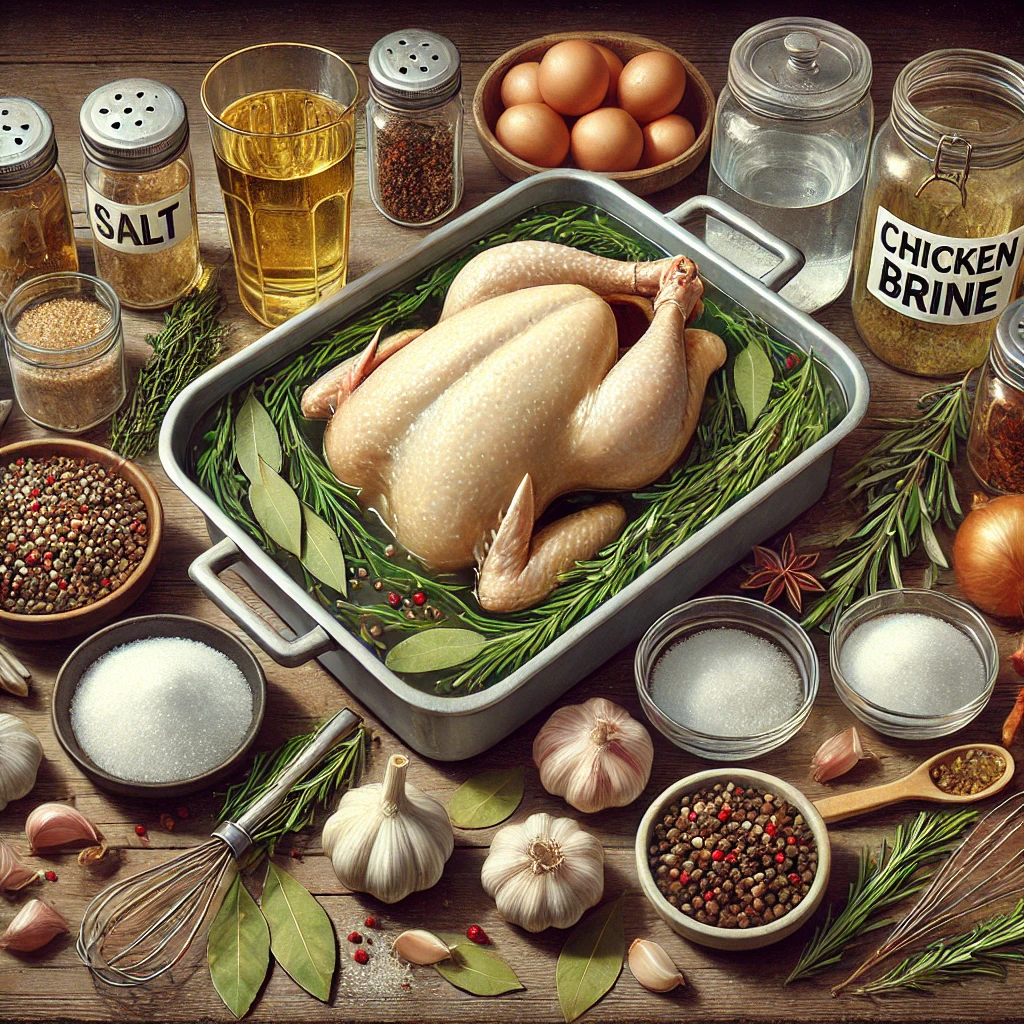
Ingredients for a Basic Chicken Brine
- Water: 4 cups
- Kosher salt: 1/4 cup
- Sugar: 2 tablespoons
- Garlic cloves (crushed): 3
- Bay leaves: 2
- Whole peppercorns: 1 tablespoon
- Fresh herbs (such as thyme or rosemary): A few sprigs
How to make Chicken Brine recipe
1. Prepare the Brine Solution
Firstly, Start by combining water, salt, and sugar in a large pot. Heat the mixture over medium heat, stirring until the salt and sugar are fully dissolved. Remove the pot from the heat and allow the brine to cool completely.
2. Add Aromatics
Once the brine has cooled, add crushed garlic cloves, bay leaves, peppercorns, and fresh herbs. These aromatics will infuse the chicken with additional flavors.
3. Submerge the Chicken
Then, Place the chicken in a large, resealable plastic bag or a deep container. Pour the cooled brine over the chicken, ensuring it is fully submerged. If necessary, weigh down the chicken with a plate to keep it immersed.
4. Refrigerate
Seal the bag or cover the container, and place it in the refrigerator. Allow the chicken to brine for at least 4 hours, but for best results, let it sit overnight.
5. Rinse and Cook
Finally, After brining, remove the chicken from the solution and rinse it thoroughly under cold water. Pat it dry with paper towels before cooking. This step ensures that the chicken isn’t too salty and helps the skin crisp up during cooking.
Tips for the Perfect Chicken Brine recipe
- Adjust Salt Levels: Depending on your taste preference, you can adjust the amount of salt in the brine.
- Experiment with Flavors: Feel free to add different herbs, spices, or even citrus fruits to the brine for a unique flavor profile.
- Timing Matters: Avoid over-brining, as it can make the chicken too salty and change its texture. Stick to the recommended time for the best results.
Benefits of Chicken Brine recipe
Enhanced Flavor
The salt in the brine allows the chicken to absorb flavors more deeply, creating a well-seasoned dish that doesn’t rely solely on surface-level seasoning.
Improved Texture and Juiciness
Brining alters the protein structure in the chicken, making it more tender and preventing it from drying out during cooking.
Better Cooking Results
Brined chicken cooks more evenly, resulting in a perfect balance between a crispy exterior and a moist interior.
Different Types of Brines
Wet Brine vs. Dry Brine
Wet brine involves soaking the chicken in a saltwater solution, while dry brine uses just salt and seasonings rubbed directly onto the meat. Both methods are effective but offer slightly different results.
Basic Brine Ingredients
A basic wet brine consists of just three ingredients: water, salt, and sugar. From there, you can add herbs, spices, and aromatics to create your desired flavor profile.
Flavor-Infused Brines
For a more complex flavor, consider adding ingredients like citrus, garlic, or even tea to your brine. These elements can add subtle notes that enhance the overall taste of your dish.
Essential Ingredients for Chicken Brine recipe
- Firstly, salt is the cornerstone of any brine. It not only seasons the chicken but also changes its protein structure, making it more tender and juicy.
- So, water acts as the base of the brine, serving as the medium that delivers salt and other flavors into the chicken. Ensure you use enough water to fully submerge the meat.
- Then, consider adding a sweet element to your brine with sugar, honey, or maple syrup. This can balance out the saltiness and add a subtle sweetness to the chicken.
- After that, include aromatics like garlic, bay leaves, rosemary, and peppercorns. These ingredients elevate the flavor of your brine, adding depth and complexity to the final dish.
- Finally, let the chicken soak in the brine to absorb all these flavors before cooking.
How to Choose the Right Brine for Your Chicken
Matching Brine to Cooking Method
Different cooking methods pair better with certain types of brines. For instance, a wet brine is great for roasting, while a dry brine works well for grilling.
Pairing Brine with Chicken Cut
The type of chicken cut also influences your choice of brine. Whole chickens benefit from a longer soak in a wet brine, while individual pieces like breasts or thighs can be quickly dry-brined.
Considering Additional Flavors
Think about the final flavor you want to achieve. A citrus brine might be perfect for a light, summery dish, while a herb-infused brine could complement a winter roast.
How Long to Brine Chicken
Whole Chicken Brining Time
A whole chicken typically needs 12-24 hours in the brine. So, depending on its size and the strength of the brine.
Chicken Breasts, Thighs, and Wings Brining Time
Smaller cuts like breasts, thighs, and wings usually require only 2-4 hours in the brine. Over-brining can lead to overly salty meat, so timing is crucial.
Quick Brining Methods
In a pinch, you can use a higher concentration of salt in your brine and reduce the soaking time. This method can be effective if you’re short on time but still want the benefits of brining.
Tips for Perfect Brining
- Firstly, choose the right container for brining. Opt for a non-reactive container like glass, stainless steel, or food-safe plastic. Avoid using aluminum, as it can react with the salt.
- So, ensure the chicken is fully submerged in the brine. If needed, add more water and salt to keep the chicken completely covered.
- Then, remember that timing is key. Don’t over-brine your chicken. While brining enhances flavor and texture, leaving the chicken in the brine for too long can result in overly salty and mushy meat.
Common Mistakes to Avoid When Brining Chicken
Firstly, over-brining is a common pitfall. Leaving chicken in the brine for too long can make it too salty and give it an unpleasant texture. Stick to recommended brining times to avoid this issue.
So, after removing the chicken from the brine, make sure to rinse it under cold water. This step is crucial to remove excess salt from the surface and prevent the chicken from being overly salty.
Then, be mindful of the salt levels in your recipe. Since brined chicken is already salted, you may need to adjust the seasoning in your dish to avoid oversalting.
Flavor Variations for Chicken Brine recipe
Citrus Brine
Add lemon, lime, or orange zest to your brine for a bright, tangy flavor that pairs well with grilled or roasted chicken.
Herb-Infused Brine
Incorporate fresh herbs like rosemary, thyme, and sage into your brine for a fragrant and savory flavor profile.
Spicy Brine
For those who like a kick, add chili flakes, jalapeños, or hot sauce to your brine. This spicy twist can add an exciting layer of flavor to your chicken.
How to Cook Brined Chicken
Roasting Brined Chicken
Preheat your oven to 425°F (220°C). Roast the chicken until the internal temperature reaches 165°F (74°C), ensuring crispy skin and juicy meat.
Grilling Brined Chicken
Grill your brined chicken over medium-high heat, turning occasionally until it’s fully cooked. The brine helps the chicken stay moist even under high heat.
Frying Brined Chicken
For fried chicken, pat the brined pieces dry, dredge them in seasoned flour, and fry in hot oil until golden brown and cooked through. The brine will keep the meat juicy inside the crispy coating.
Serving Suggestions for Brined Chicken
Firstly, consider side dishes that complement chicken brine recipe. Roasted vegetables, mashed potatoes, or a fresh salad make for a well-rounded meal.
So, for added flavor and moisture, pair your brined chicken with sauces like garlic butter, chimichurri, or a rich gravy.
Health Considerations When Brining
Firstly, be aware of the sodium levels in chicken brine recipe. Brining adds sodium, so if you’re watching your intake, consider using less salt or a lower-sodium alternative.
So, for a healthier brine, think about using natural sweeteners like honey or agave while reducing the salt content.
Then, you can also experiment by adding more herbs and spices for flavor, making your brine both healthier and flavorful.
More Chicken recipes
So, Here some Chicken recipes:
- Instant Pot chicken wings
- Air Fryer Chicken Legs
- Easy Instant Pot chicken fajitas
- Air Fryer Chicken Breast
- Crispiest Breaded Chicken Cutlets
- Air Fryer Chicken Tenders
- Chicken Cutlet Recipe
- Air Fryer Chicken Wings (SUPER CRISPY!)
- Marry Me Chicken Pasta
- Instant Pot chicken thighs with gravy
- Air Fryer Chicken Thighs
- Alice springs chicken recipe
FAQs
Yes, over-brining can lead to overly salty and mushy chicken. Stick to the recommended brining times to avoid this issue.
Not rinsing the chicken after brining can result in a very salty dish. Rinsing helps remove excess salt from the surface.
No, it’s not safe to reuse brine as it can harbor bacteria from the raw chicken. Always discard the brine after use.
Store brined chicken in the refrigerator until you’re ready to cook it. Use it within a day or two for the best results.
You can brine frozen chicken, but it’s best to thaw it first to ensure even brining.
So, If you enjoy, please Follow my facebook page to be notified every time I publish a recipe!
Love this recipe? Give it a ⭐⭐⭐⭐⭐ review in the recipe card below!

Chicken brine recipe
Ingredients
Brine:
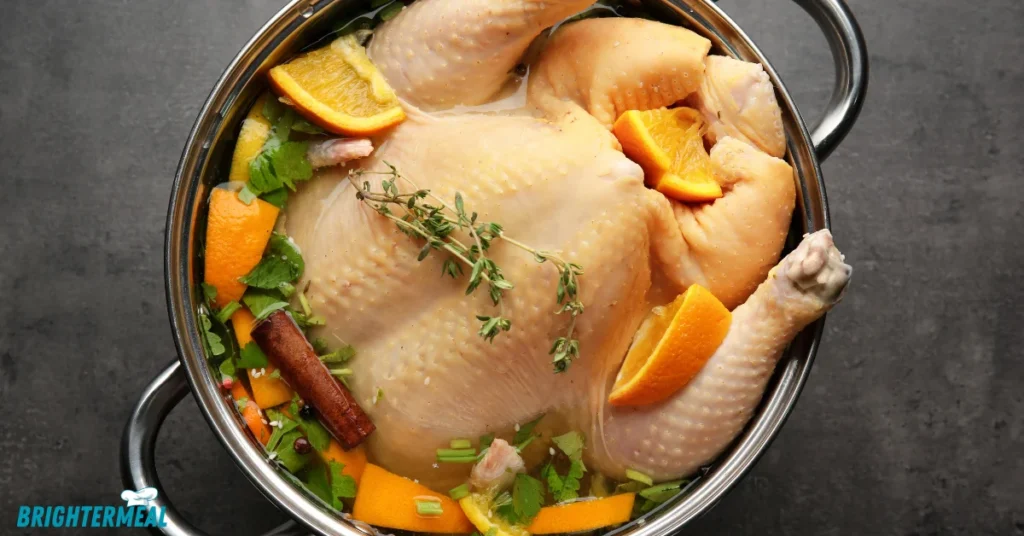
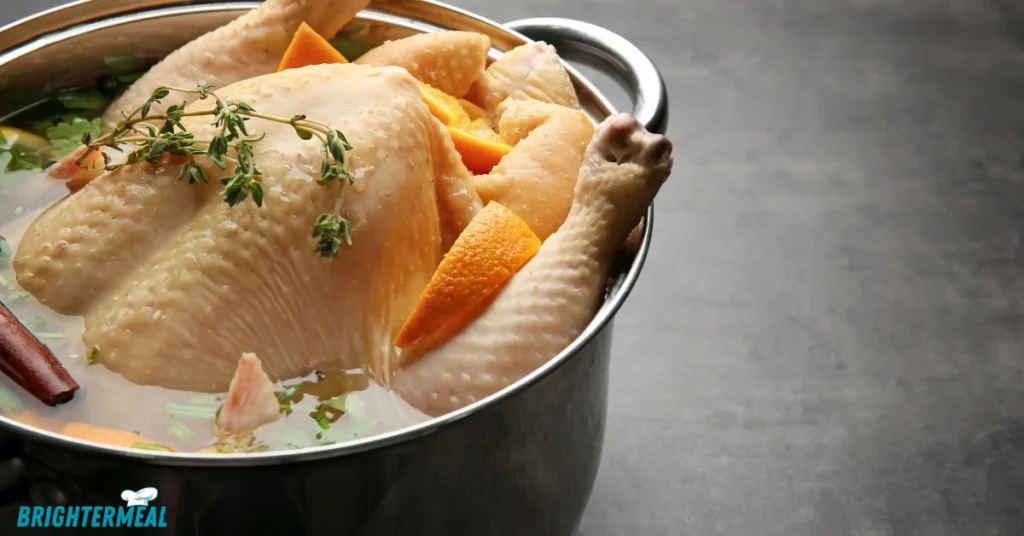
- 2 liters / 2 quarts cold tap water
- 1/3 cup kosher or cooking salt Note 1
- 2 lemons quartered
- 10 sprigs fresh parsley
- 7 sprigs thyme
- 2 sprigs rosemary
- 5 fresh bay leaves or 3 dried
- 1/4 cup honey
- 6 garlic cloves smashed (Note 3)
- 1 tablespoon black peppercorns
Roast Chicken:
- 1.5 – 2 kg / 3-4 lb whole chicken
- 3 tablespoons / 40g melted butter
- Salt and pepper to season
Instructions
Brining:
- Pour about one-third of the water into a large pot with the remaining brine ingredients. Bring to a boil and simmer for 1 minute, stirring to dissolve the salt.
- Remove from heat and add the remaining water. Let the brine cool completely before using (about 30 minutes, then refrigerate for 1 1/2 hours). Important: Do not add the chicken until the brine is fully cooled to avoid health risks (Note 4).
- Place the chicken upside down (with the legs and breast on the underside) and submerge it in the brine. Cover and refrigerate for 12 – 24 hours (Note 5). If the chicken doesn’t stay fully submerged, it’s okay as long as the breast side is covered by the brine.
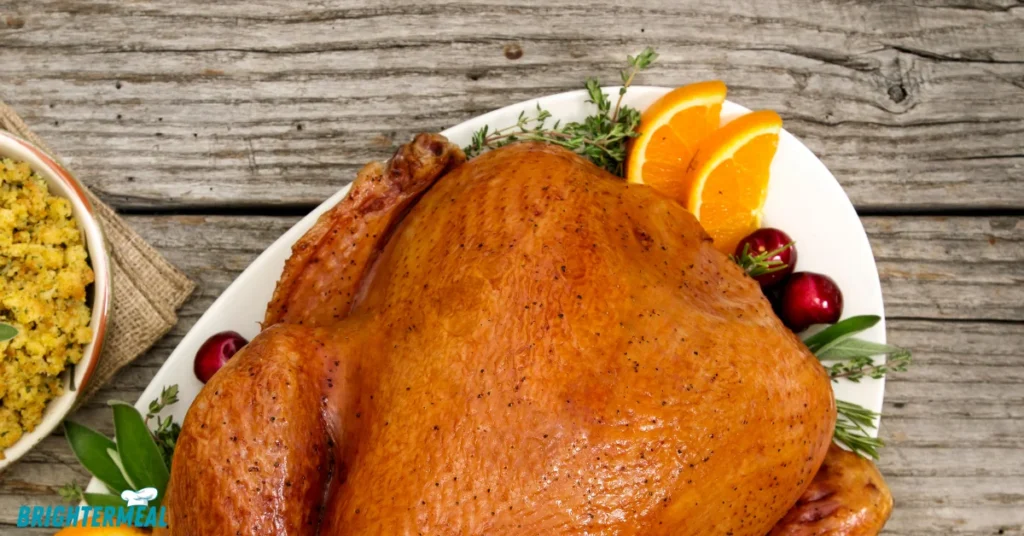
Roasting Brined Chicken:
- Remove the chicken from the brine and pat it dry to remove excess moisture.
- If desired, tie the legs with string and tuck the wings under. Brush the chicken with most of the melted butter, covering all surfaces (the butter will solidify upon contact).
- Sprinkle with pepper and a tiny pinch of salt. Place the chicken on a rack in a heavy-based roasting tray and let it sit for 20 minutes.
- Preheat your oven to 220°C / 430°F.
- Reduce the oven temperature to 180°C / 350°F, then roast the chicken for 50 minutes to 1 hour (Note 7), or until the internal temperature at the joint between the leg and thigh reaches 75°C / 165°F, and the juices run clear.
- Check the chicken at 45 minutes. Rotate the pan if necessary for even browning and brush the top with the remaining melted butter.
- Remove the chicken from the roasting tray, cover loosely with foil, and let it rest for 10 to 15 minutes.
- The chicken will be juicy and may only need a slight drizzle of the pan juices (be cautious as it can be salty). Alternatively, prepare gravy while the chicken rests (see Note 8).
Notes
- Honey: Substitute with maple syrup or 1/4 cup brown sugar.
- Fresh herbs: Use more of one type, switch to sage leaves, or use 1 tablespoon dried herbs. You can also use lime or orange instead of lemons, or omit them entirely.
- Peppercorns: Substitute with 1/2 teaspoon ground pepper.
- 50g / 3 tablespoons butter
- 3 tablespoons / 40g flour (any white)
- Pan juices topped up with low-sodium chicken broth to make 1 cup
- 1 cup / 250ml water Melt butter over medium heat, add flour, and stir for 1 minute. Gradually whisk in half of the liquid until smooth, then add the remaining liquid and water. Continue cooking for 2 minutes, stirring regularly until the gravy thickens. Season with pepper—salt is likely unnecessary.


Love this recipe? Give it a ⭐⭐⭐⭐⭐ review in the recipe card below!